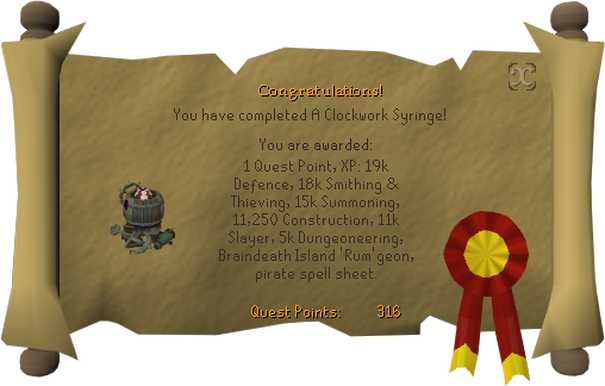
A Clockwork Syringe
Start point: Enter the portal to your player-owned house Members only: Yes Wiki difficulty: 4***** Official difficulty: Master Length: Long Requirements: [show] Quests:
- Rocking Out
- The Great Brain Robbery
- Recipe for Disaster (Freeing Pirate Pete)
- Creature of Fenkenstrain
- Priest in Peril
- The Restless Ghost
- Cabin Fever
- Pirate's Treasure
- Rum Deal
- Zogre Flesh Eaters
- Druidic Ritual
- Big Chompy Bird Hunting
- Jungle Potion
- Zogre Flesh Eaters
- The Great Brain Robbery
- 50 Dungeoneering
- 61 Slayer
- 62 Construction
- 65 Summoning (Boosts cannot be used)
- 74 Smithing (Boosts cannot be used)
- 74 Thieving (Boosts cannot be used)
- 76 Defence (Boosts cannot be used)
- Fishbowl Helmet. If you don't have you will receive it during the quest.
- Diving Apparatus. If you don't have you will receive it during the quest
- Combat gear
- Prayer potions
- Stat restore potions Sup. Restore Mixes do not work (Glitch)
- Super Set or Extreme Set
- Antipoison
- Food
- Ectophial
Starting out A big box. Wonder what's inside? Added by Spineweilder Go to the player-owned house portal, and attempt to enter your house. Postie Pete will appear with a note for you. After he leaves, there will be an option in the portal interface to pick up the delivery note from your portal. Reading the note will provide for the starting of the quest.
After reading the note, you may use the player-owned house portal to choose the "A Clockwork Syringe" option, which takes you to your house where a the large crate lies waiting. When you are ready, investigate the crate to start a fight with Barrelchest Mk II (lv188).
Dealing with the delivery The barrelchest uses melee and range. It mainly uses the attack style which you aren't protected against, having melee as a priority over range. It will also use a special attack that knocks the player back and destroys surrounding items in the house. It will drain your Constitution gradually throughout the fight (with a minimum of 10 Constitution). The special attack does not cause damage, but rather drains the player's constitution level preventing the player from healing above that drained level. The drained levels slowly return like normal. A Super restore potion (Sup. Restore Mix potions will not work for some reason, probably a glich) can be used to restore lost Constitution levels and therefore the ability to heal back to your maximum health, but doesn't restore any life points. The thermal bath at Oo'glog, or simply entering a dungeon or duel will restore the stat entirely. You can safespot with the Protect from Ranged /Deflect Ranged on, by simply hiding behind a wall and attacking using either ranged, magic, or a halberd.
During the fight, the player's health bar measures the percentage of active constitution. A player at 50/80 constitution at or over 500 health will show a full health bar while the health meter by minimap will turn from green to yellow, etc. Eating will not heal above the current constitution level.
The barrelchest will be an easy fight for anyone with 80+ melee stats who has brought a decent weapon. Bringing a Dragon halberd, ranging or magic equipment and hiding behind a house wall is also a good way to beat him because he can not break undecorated walls. Simply run away as he shouts "Prepare yourself" to avoid losing lifepoints and find an new safe spot if he destroyed your last one. In addition, he rarely uses his ranged attack even if you are standing away from him, although this may simply be a glitch. Note that your POH altar will not be available after he destroys it (temporarily). If you die, you are teleported just outside your player-owned home portal and don't lose anything.
Once he is defeated, all the items in your house will be repaired by the estate agent. Talk to the estate agent and interrogate the zombie head which is all that remains of the barrel chest. You must torture him by getting him stressed to tell you the information he knows using an interface that appears in the top left corner.
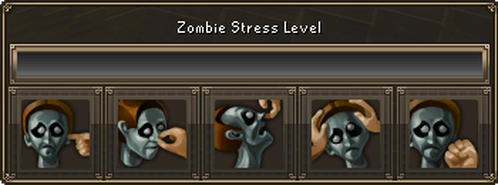
The 1st option increases the zombie's stress meter the most, but has the longest cooldown. Use the 2nd option and 3rd option, in that order, whenever possible for maximum effect. Then use "Shake head" (4th option), this will bring his stress quite high. Use the 1st and 5th attack whenever possible.
After you fill the zombie's stress bar, it will blurt out information over the return of Rabid Jack, without providing any further information. Your character then hints at talking to Bill Teach about this whole incident.
Warning Bill Teach Teleport to Port Phasmatys, using the Ectophial (or walk if you don't have it). Talk to Bill Teach in the Pub. He will tell you to travel to Harpoon Joe's in Northern Mos Le'Harmless. Travel on the Adventurous, Bill's boat, found on the eastern-most pier.
The chair in Joe's Pub that you have to ask for a Long Drop at. Added by TheLunarFrog Meet Bill Teach in the basement of 'Harpoon Joe's House of 'Rum''. Joe's house of rum is the northern-most pub. To gain access to the basement, sit at the table in the north-eastern corner of the house. The chair you should sit at stands out because it's a different colour than the rest of the chairs. Order a 'Long Drop'. When Joe asks if you are sure, reply 'Aye, drop me'. (Make sure to bring the zombie's head with you.)
Talk with Bill Teach in the basement, and use the Zombie Head on the table when he asks for evidence. He will give you a teleport scroll and tell you to ask Braindeath for a 'Twiblik night special'.
TIP: If you intend to continue the next part without banking, get ready for combat. Take very good food, prayer potions, Antipoison and stat restore. 1 of 3 or 4 doses potion each should be enough. Make sure you have 2 empty inventory spaces as Captain Braindeath will give you a diving apparatus and a fishbowl helmet if you don't have a pair of your own.
Equip good armour, but not a helmet or cape. An emergency teleport or ectophial could be useful as you will sustain continous damage. Familiars may not be used as they cannot be taken into the watery dungeon.
Go to Braindeath Island using the scroll teleport and ask Captain Braindeath for the Twiblik night special, and he will tell you that he has problems of his own. He has lost some workers in a dungeon north of town and needs your help. You agree to rescue them or at least find out what happened, while he sorts out the Twiblik Night special.
Finding the workers Warning: If you die while in this dungeon, your grave will appear inside the dungeon, exactly where you died. You must have a diving apparatus to get back in. If you don't have a spare, speak to Murphy by the Fishing Trawler minigame. The grave may appear outside the entrance to the dungeon.
TIP: Protect/Deflect from Melee with good range defence is recommended, throughout the dungeon, as the monsters have very accurate attacks.
Head south after talking to Braindeath and climb down the ladder. Go north-west past 50% Luke by clicking on the gate. Go directly north and enter the dungeon entrance with your diving gear equipped (this is given to you by Braindeath during your conversation with him) and good melee gear. You cannot take a familiar with you as it is an underwater area.
Note: As it is a multicombat area, where the enemies hit very accurately with melee and ranged attacks, and you may not bring a familiar, so be prepared. The brine sabre proves particularly useful in this dungeon. The 'Rum'-pumped crabs (combat level is various) seem to melee, and can be trapped behind various pillars, while the level 65 general malpractitioners range from quite a distance, throwing what appear to be exploding syringes, even through walls. The general malpractitioners also repeatedly say "Taste some 'rum', little crab!" as they are ranging, suggesting they heal the crabs. The targeted crab also seems to have its accuracy boosted as well as its attack speed increased up to dart speed. It is recommended that you kill the general malpractitioners first if clearing the rooms. Some players have reported that in this fight, as in the barrelchest fight, the health bar does not show damage, so watch your life points icon near the minimap. The malpractitioners can also poison starting at 58 damage.
Journey down each of the three forks in the area, either killing or avoiding the monsters, to find each of the workers deceased. If you shut the door behind you when you enter each room where a body lies, the number of opponents to be defeated is much fewer. In order to investigate each worker far enough to get their name, you will likely have to clear some enemies from around the body. Once you have all the three names, you should return to Cap'n Braindeath and give him the bad news, after which you can receive the Twiblik Night Special.
Getting into Bloodsplatter Isle The difficult combat is done and the next phase of the quest involves delivering the Twiblik Night Special to Bill in the basement. Teleport using the scroll to Mos Le'Harmless and talk to Bill. He uses an amusing set of items to get the zombie head to tell you where the barrelchests are being built. Return south to Bill's ship the adventurous, and use the "A Clockwork Syringe" option to begin your travel.
Speak to Bill and after some short dialogue barrelchests fire cannons at you, and so you are forced to find a way to the island yourself by building a Cannonball-barrel boat to launch you there.
After talking with Bill, he will tell you go to the lower parts of the ship to make the barrel boat. You need to go down the ladders to the hull of the ship. There pick up the hammer and tinder box, and open and search both the repair locker and gun locker. Take a barrel from the barrel stack, as well as some gunpowder (at least 3) from the gunpowder barrel.
Next, use the gunpowder on the chain to flash-heat it. Then smith the chain and cannonball on the anvil. Then use your chain-with-cannonball on the barrel. Your cannonball-barrel boat is ready.
Go back up the ladder to the main deck. Look on your mini map for the cannon closest to the arrow. It requires two gunpowders to fire you with your cannon-barrel boat. Now 'Take-The-Ride Cannon' to Bloodsplatter Isle.
Investigating Bloodsplatter Isle When you arrive, investigate the Perch Rock. The seagull (Baron von Hattenkrapper) from Rocking Out will appear and will forgive you for what you did to it during Rocking Out. It wants to work with you to destroy the barrelchests, so that the seagull can freely roam around the Isle. You must use your Summoning skill to steer him around while dropping cannonballs on the barrelchest-MKs.(keep your camera to the north to make this part easier).
When you have killed them all, a cutscene occurs. Leave the Isle and swim to Bill Teach on his ship, and update him on the fate of the barrelchests on the Isle.
Ask Bill to take you back to Bloodsplatter Isle. You arrive at a dock, from which you can enter the factory compound. Run in north-east (north of the locked door), collect a surgical mask, roll of bandage, bundle of parts (barrelchest part), including a few gunpowders and barrels if you like, and then approach the yellow dots to get caught and jailed.
Escape your cell and return to Bill by using the signalling point at the end of the dock you arrived at.
He will help you construct a barrelchest disguise, with which you can investigate and sabotage the operations, gathering evidence as you go. When you have the disguise, have Bill send you back to the island. Enter the compound and wear the barrelchest disguise.
Collecting Evidence There is a notice board within each of the 5 rooms from which the player must collect letters to complete the evidence file. In order to get the letters, the player must do various activities to distract or kill the guards in each room. The player may be attacked by Grimterms.
Letter One: This is in the south-west room, the player must first subdue the Dis-orderly by sabotaging the gas canister to the south of the room. Once the laughing gas fills the room, 'tell-joke' to each of them and then brutalise each of them. After all the 3 Dis-orderly are dead, investigate the notice board.
Letter Two: Stun each of the grimterns in the western-most room by using the cannon (right click option), then dispose of them one by one. The player can also take on all three of them at once. Investigate the notice board after killing them.
Letter Three: Simply talk to one of the drunkards lying on the bed in the north-west room to find they are extremely drunk, then investigate the notice board.
Letter Four: Loosen each of the three undead arms found in the north-eastern room, and then exit the room. After the short cutscene investigate the notice board.
Letter Five: Return to the main room and collect three barrels and three gun powder in human form. Use the gunpowder on each of the three barrels, then wear the disguise again and head to the south-eastern room. The attendead will ask the player to help finish the barrel chests. Do so by using the gun powder filled barrels and sabotage them. Destroy any one of the barrelchests, exploding the remaining ones and killing the attended. Now investigate the notice board.
After collecting all letters, return back to Bill by signalling him from the dock.
Destroying the Factory Construction Line Talk to Bill Teach onboard his ship. After taking the barrelchest disguise from you, he hands you a stash of mini powder kegs (Bundle o' kegs). Now ask him to return you to Bloodsplatter Isle so that you can complete the task of destroying the factory construction line. Head to the eastern-most room (the room with the red line) . Pull the lever to activate the three conveyor belts, and use the Bundle o' kegs on them continuously until each of the conveyor belts explode. Occasionally, a zombie pirate will climb onto the conveyors and approach you; if it reaches the end of the conveyor it will jump off and initiate combat. This can be prevented by sending a keg down the conveyor while the zombie pirate is still on it; this kills it instantly.
Battle at Sea Note: This is completely safe. There is no need to prepare for a fight. If your zomboat is sunk, you will reappear on the dock with a new zomboat.
After all of the three conveyor belts have exploded, Mi-Gor and Mechanical Murphy attempt to escape. Climb over the destroyed wall between the conveyor lines, and head east through the door opening to the docks. Descend the ladder, and a cutscene will appear.
Board the unoccupied zomboat to chase your enemies, the two bad guys (5 hits to sink) and three other zomboats (2 hits to sink). Shoot at the enemy boats by using the available interface, or by using a right-click option on the enemy boat. Try to attack them one on one, backing off to recover and repair damage when necessary. Enemy boats can not repair damage.
After all hostile boats are sunk, you will return to Bill's boat and sail back to Mos Le'Harmless. Go back to Joe's Pub basement to finish the quest. Bill Teach is waiting there and after you have spoken to him, the quest is finished.